How I Hosted a Hot Wheels Themed Birthday Party
My best friend of 30+ years knows how much I love planning parties, so when she asked if I would help design the decor for her son’s 3rd birthday, I immediately said yes. I was so happy she thought of me to help take some of the stress off planning a party for a very busy toddler.
This was also the first time I had ever been asked to create a design plan and present it to a “client,” which made it extra fun (and a little nerve-wracking).
We talked through the basics first: the theme, the budget, and the location.
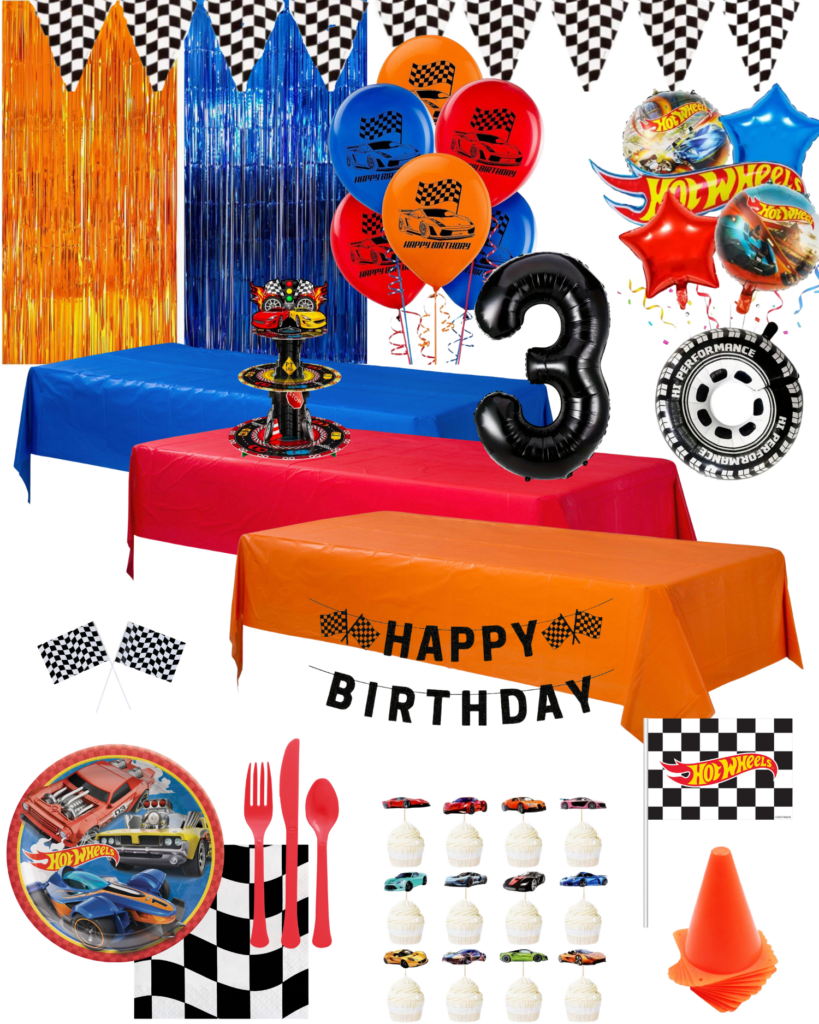
The theme was Hot Wheels (such a fun one).
The decor budget was $150.
The party was being held at a local community centre, which meant we had a large blank space to work with.
The party ran from 1:00–3:00 PM, with half the time spent swimming and the other half in the party room for food and celebrating.
The biggest challenge?
We only had one hour to set up the entire space… AKA while the kids were swimming.
Not going to lie, I was a bit stressed about the timing. My instinct is always to go all out with decor, but I had to be realistic about what was actually possible in that timeframe. I wouldn’t have hours to experiment with layouts or troubleshoot setbacks.
Thankfully, I’m a big planner and my friend was incredibly helpful by sending photos and details of the room ahead of time.
Here’s how I planned and executed a birthday party for 30 people in a community centre.
Step 1: Start with Pinterest and a Moodboard
Since the theme was Hot Wheels, the first thing I did was head to Pinterest and start a board dedicated to the party. I pinned anything that felt cute, achievable, and on theme.
From there, I started researching items to see what things actually cost and what I could easily source. Using that information, I built my own moodboard based on real items I could buy.
I didn’t want to show my friend ideas that would end up being way outside the budget.
I also looked at what decor elements I could DIY to keep costs down. DIY isn’t for everyone, but when you’re working with a smaller budget it can make a huge difference.
Part of planning is deciding what decor deserves the bigger portion of the budget. Not every element needs to be expensive if the main focal areas are strong.
Once I had everything mapped out, I sent my friend a rough moodboard with estimated pricing for approval. I say rough because some items depended on what I could find at the dollar store.
She loved it and was so excited to see it come to life. Time to get to work!
Step 2: Create a Shopping Plan
Next, I made a master list of everything I needed and categorized it into:
- Items to buy online
- Items to shop for locally
- DIY materials
Always check your local dollar stores first before ordering online. So often I find items there that are significantly cheaper than party stores or Amazon. If you have the time, it’s worth doing a quick in-store search.
I had about 4.5 weeks to prepare, so once my lists were ready I started shopping and ordering anything I couldn’t find locally.
Shop the Party

- Two weeks before the party: I started working on the DIY decor.
- One week before the party: I gathered all the decor together to make sure nothing was missing.
Step 3: Plan the Setup (My Secret Weapon)
I created a visual setup guide for the room based on the photos I had. Some people might think this is a little over the top, but it saved so much time.
Because I knew we would have lots of people helping, I didn’t want to spend valuable setup time explaining where everything should go.
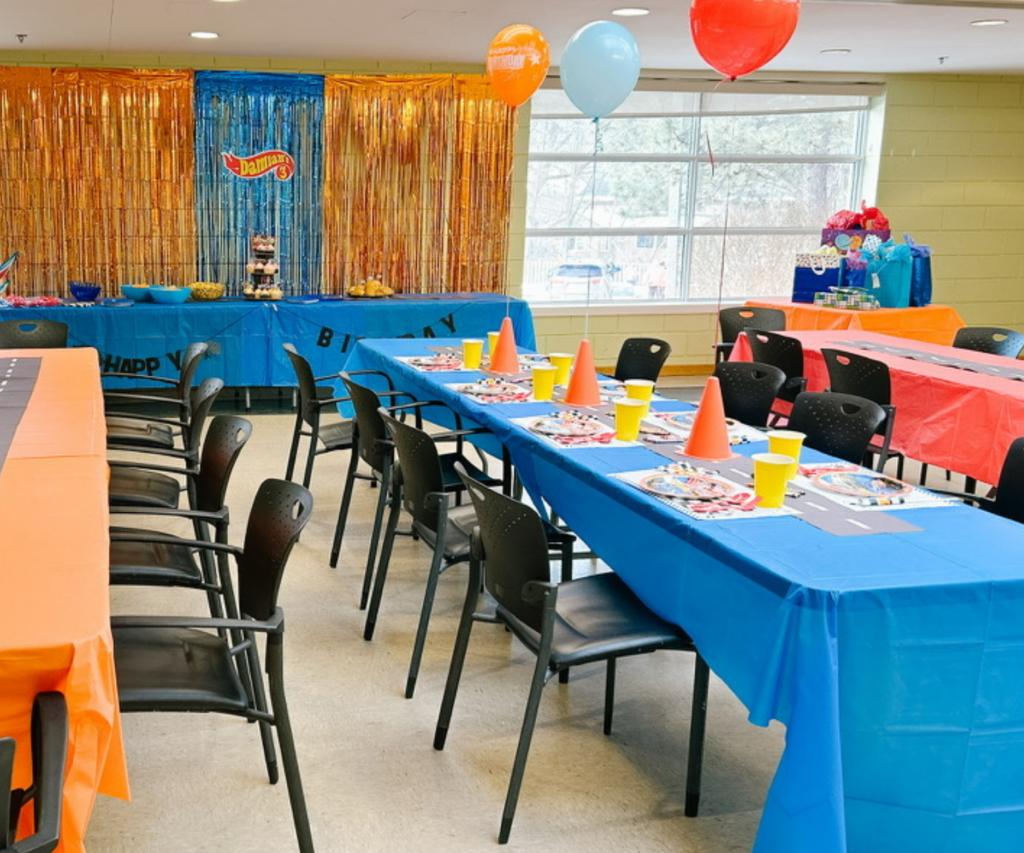
Instead, I divided the room into decor zones:
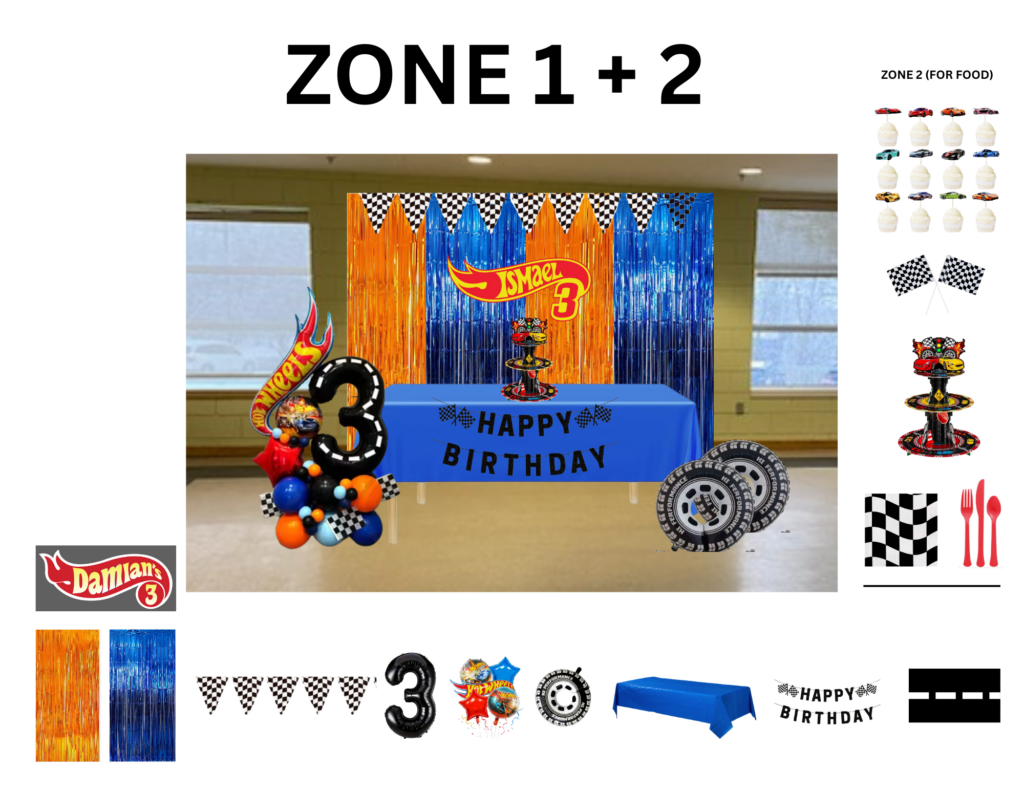
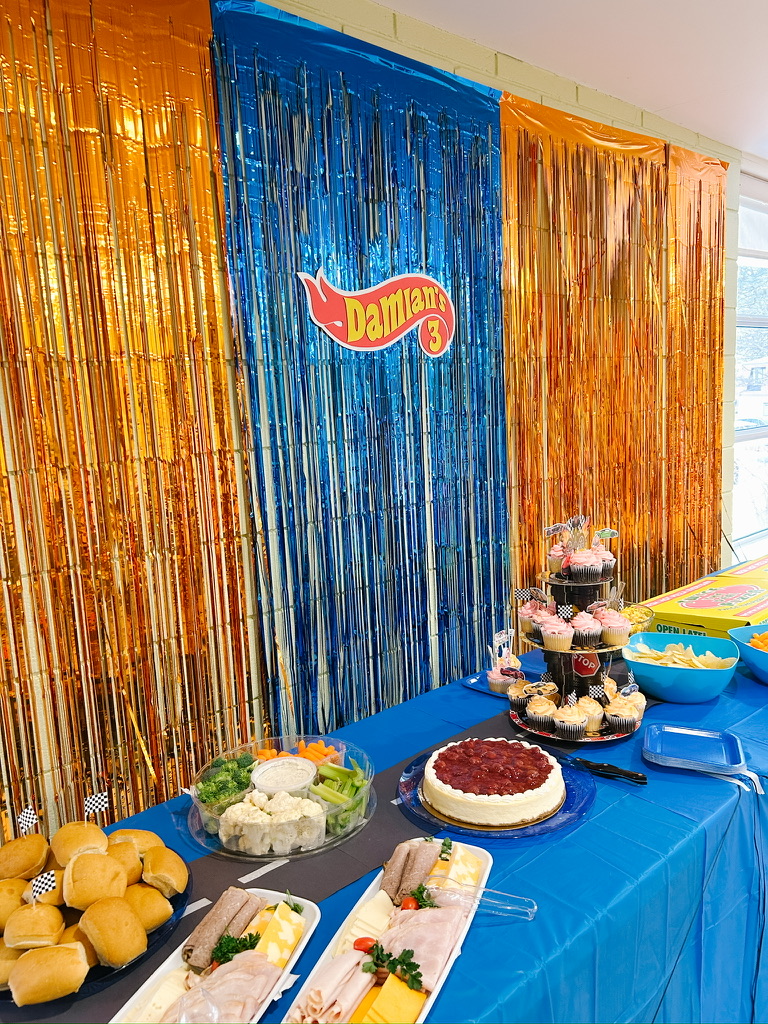
Zone 1 + 2: Focal wall and food table
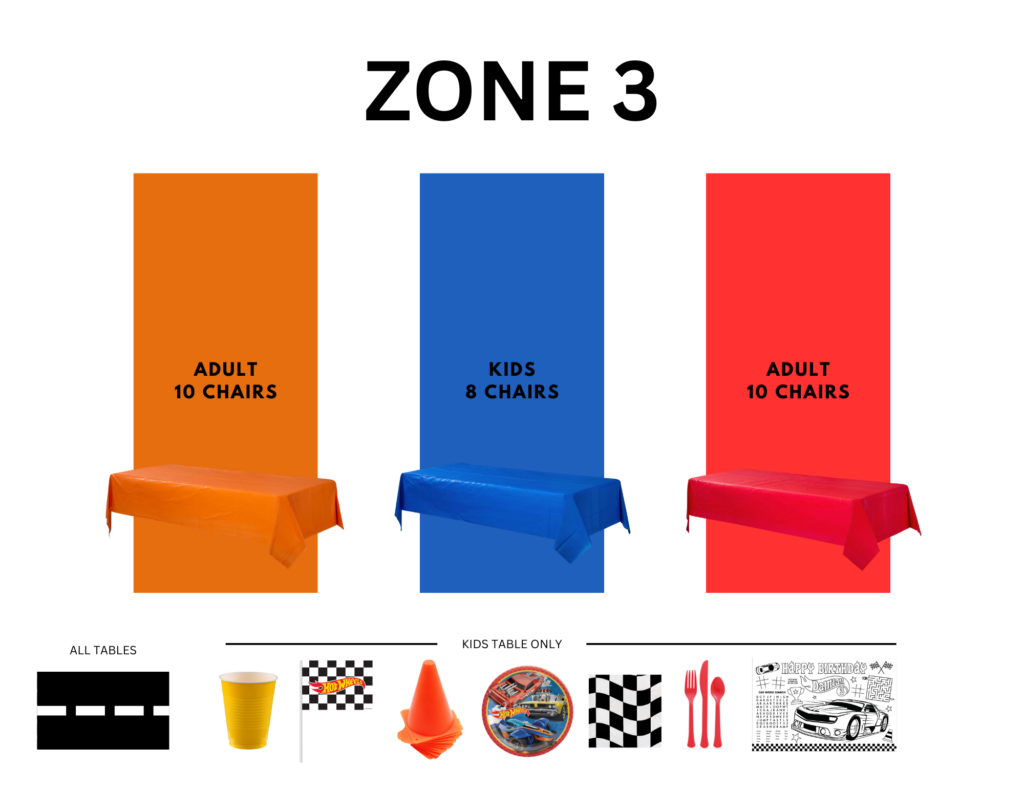
Zone 3: Guest tables for kids and adults
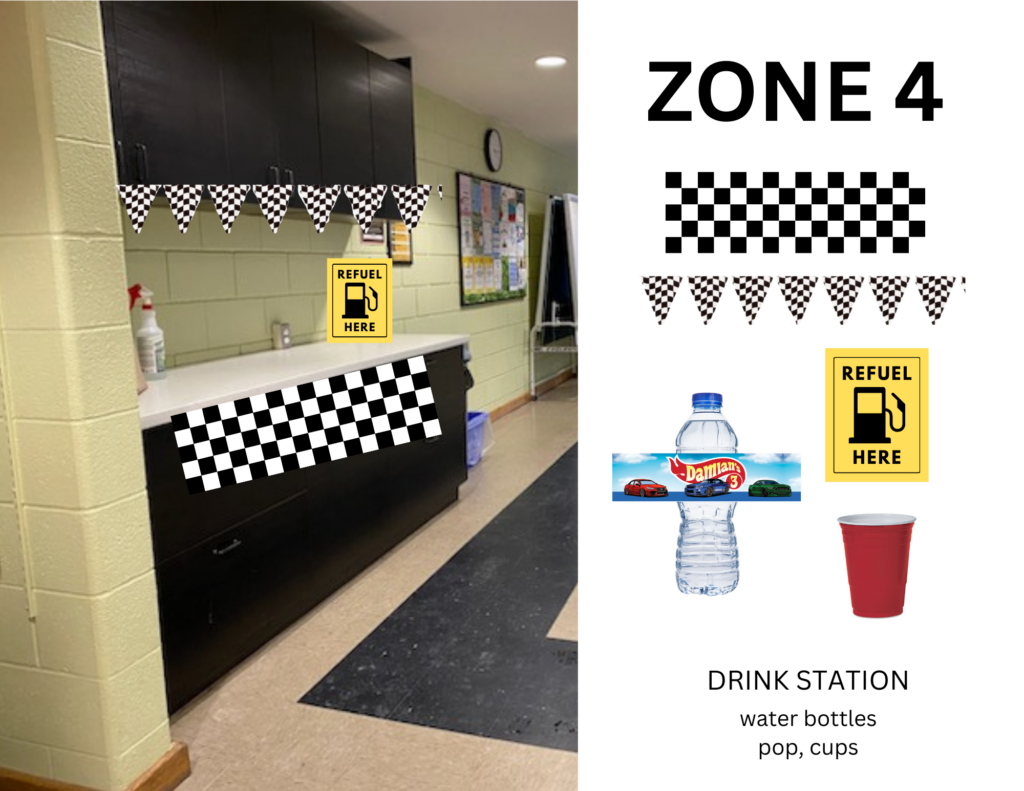
Zone 4: Drink station
The night before the party, I also packed the decor by zone, grouping everything into bags based on where it would go.
When we arrived at the venue, it was incredibly easy to hand someone a bag and say, “This is Zone 3.”
The DIY Decor
To stay within the $150 budget, I made several decor elements myself:
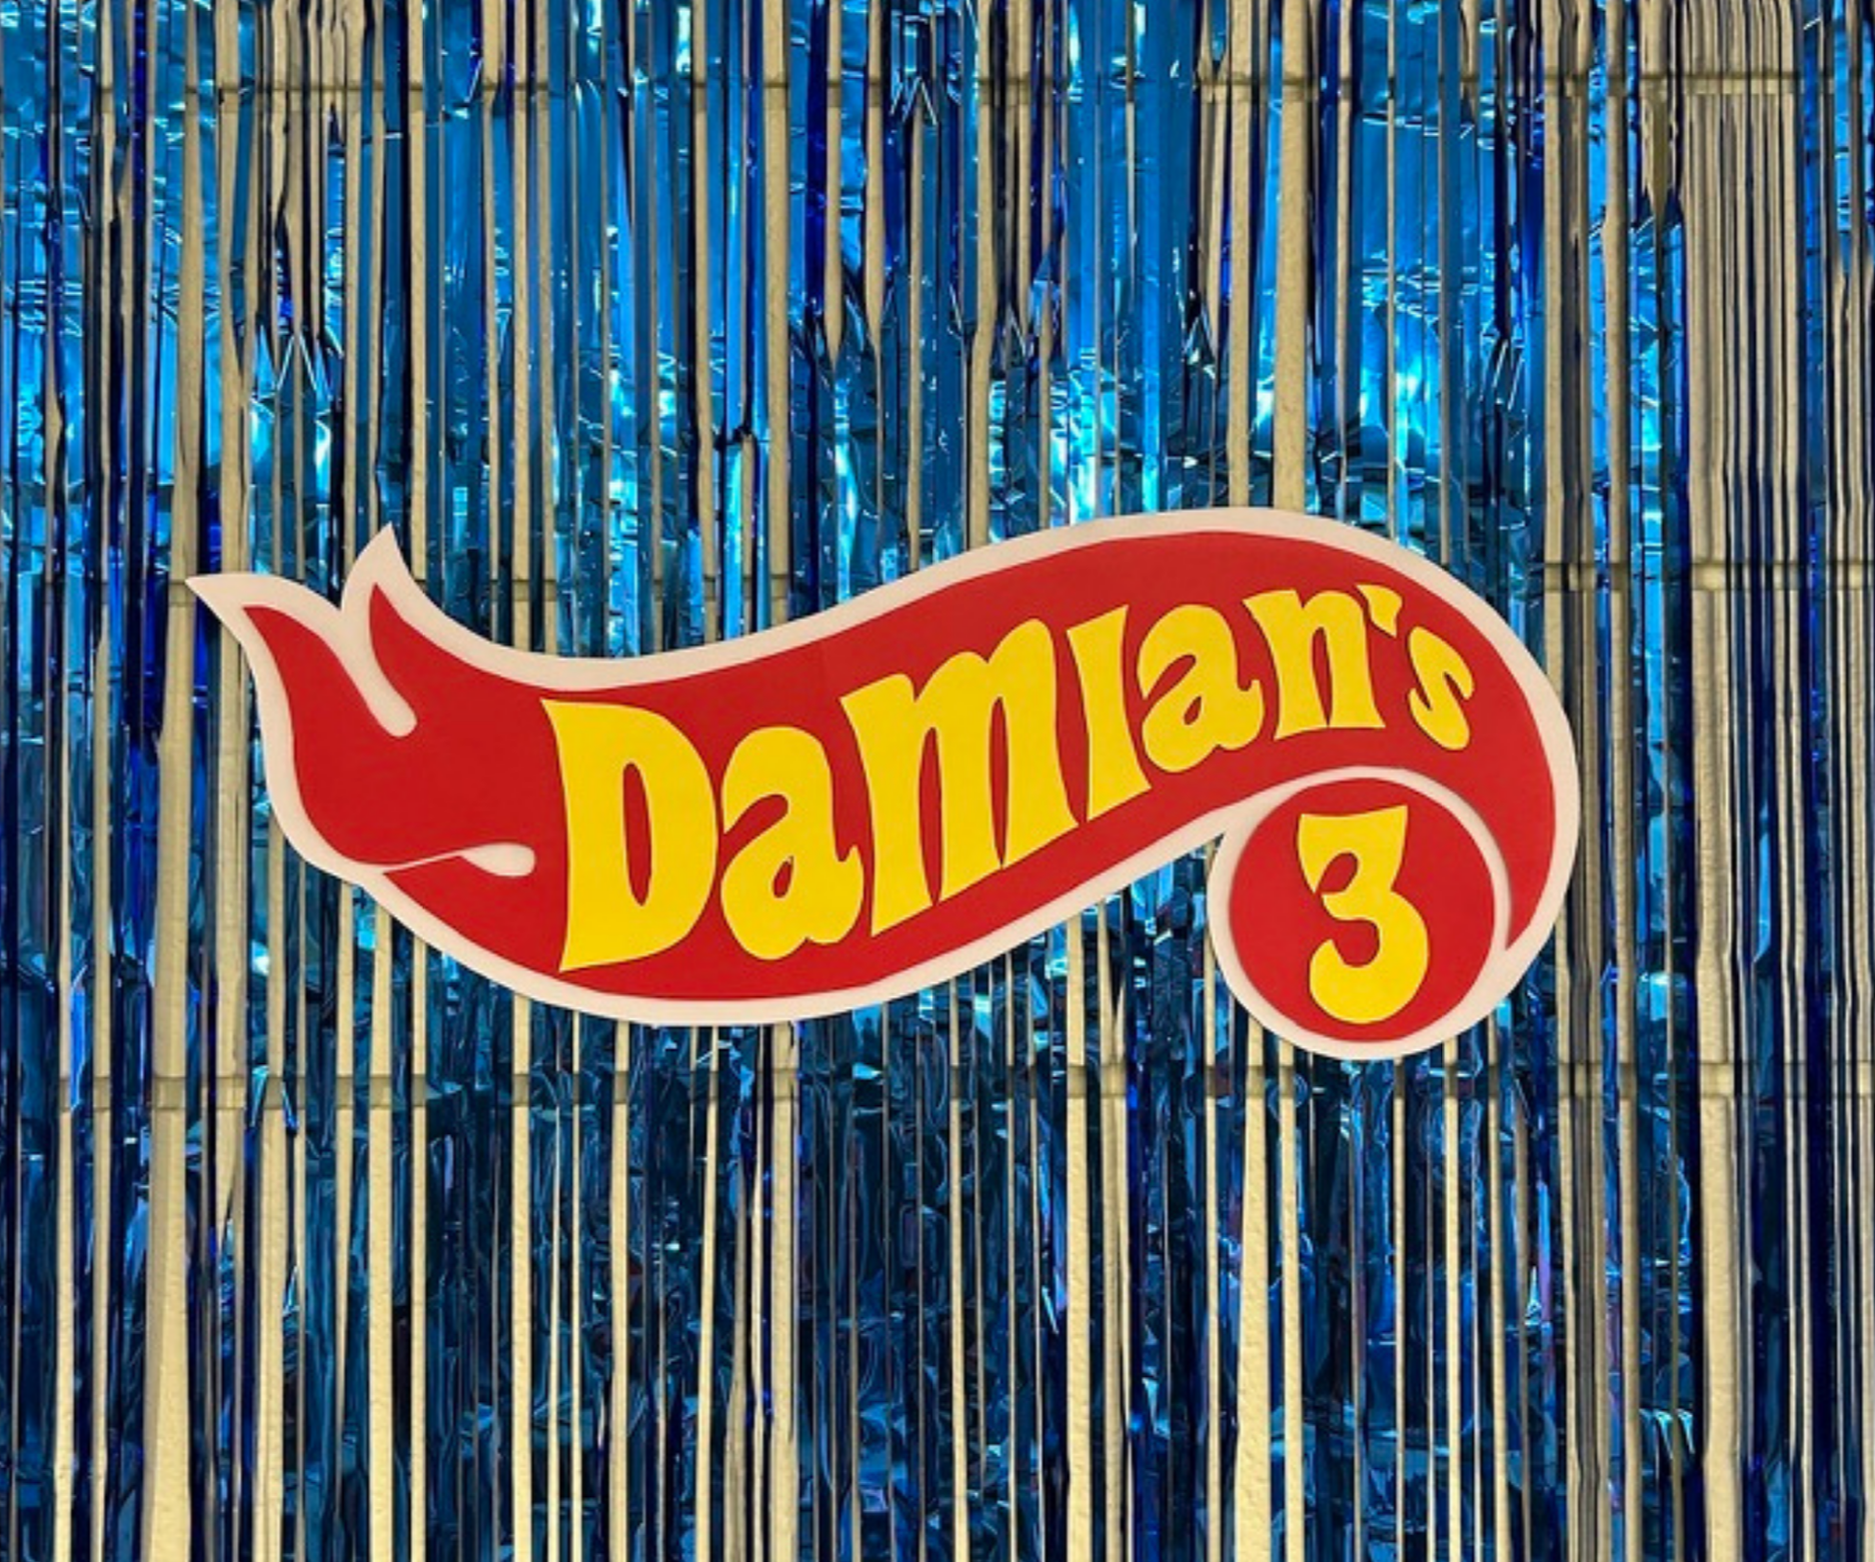
Hot Wheels “Damian” Sign
This was definitely the most labour-intensive DIY. If you own a Cricut, this would be much easier. I don’t, so I did a lot of tracing and hand cutting. (You can also find custom ones on Etsy if you want to skip the DIY.)
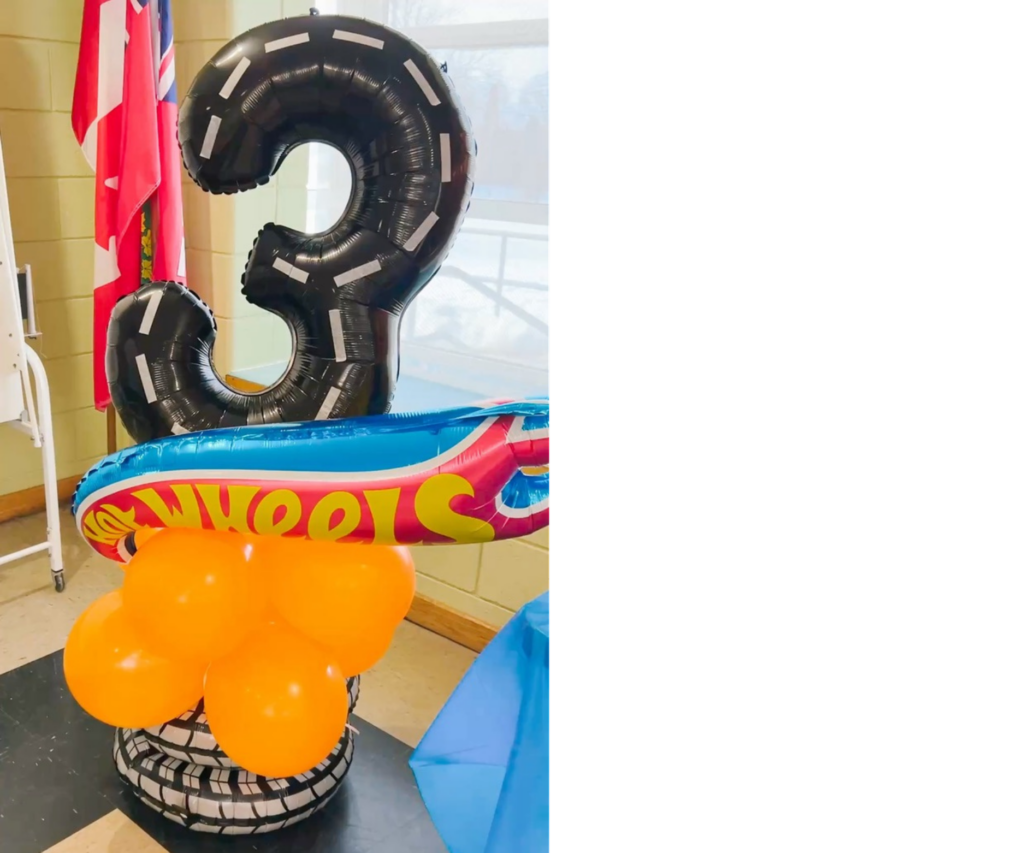
The Giant “3” Balloon
I ordered a large number 3 balloon and used white masking tape to create a road effect.
Balloon Stacks
These were easier than I expected. I followed a quick YouTube tutorial and didn’t need any helium.
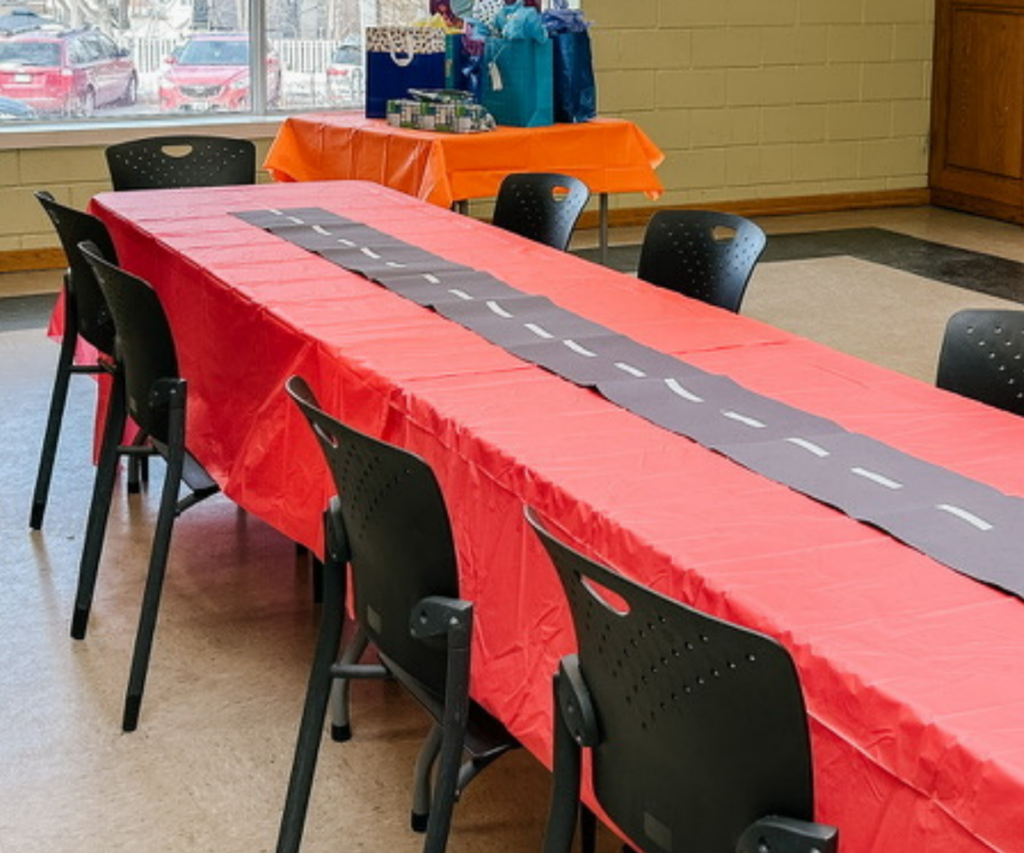
Road Table Runners
I taped together black construction paper and added white masking tape lines to create the look of roads.
Drink Station Signs
I designed these myself in Canva. You can grab them for free here!
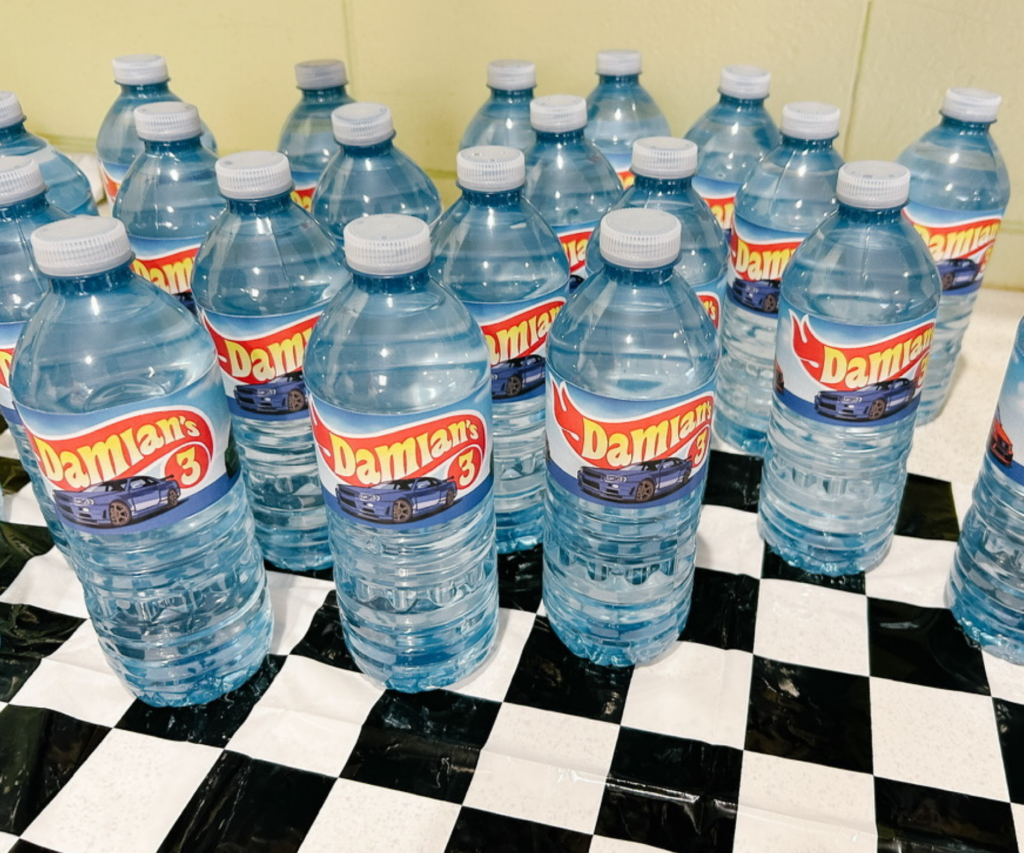
Water Bottle Labels
I purchased a Hot Wheels–style font on Etsy and used it to create the “Damian” logo and matching water bottle labels.
One thing I didn’t think about until later: the bottles couldn’t sit in ice because the paper labels would get ruined. If you plan to do this, keep them refrigerated or print on waterproof labels.
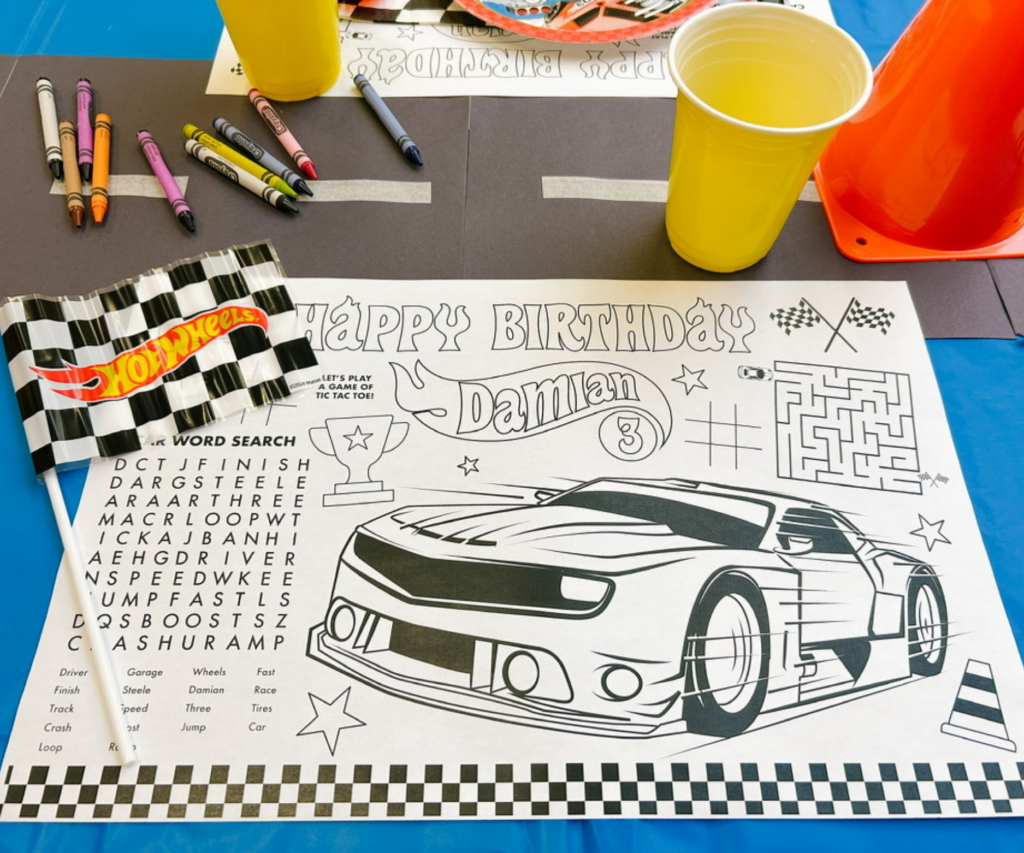
Colouring Placemats
I designed these myself as well, but you can also find customizable ones on Etsy.
Decor That Was Purchased
The rest of the decor came from Amazon, Temu, and Party City.
Party City had lots of officially branded Hot Wheels decor, but I didn’t want to rely only on licensed items. Instead, I mixed in general racing-themed decor like checkered flags and bold colours.
BUDGET TIP
If you’re working with a specific theme but want to keep costs lower, mix in non-branded items that still match the theme. Using colours, patterns, and related elements makes everything feel intentional without paying premium prices for licensed decor.
The Food Plan
I wasn’t in charge of the food, but I made sure it was considered when designing the room layout.
Since there would be cupcakes instead of cake, I added a fun cupcake stand and used small car picks as decoration.
Paper plates, cups, napkins, and cutlery were all chosen in Hot Wheels colours to tie everything together.
Because the party was at a community centre, the food needed to be simple and easy to transport:
- Fresh veggies and dip
- Chips
- Premade sandwiches
- Party pizzas delivered right after swimming
- Cupcakes
Everything came together perfectly and we managed to fully set up the room in just under an hour, including the food.
A few days before the party I worried that my decor plan might be a little over the top for the short amount of time the kids would actually spend in the room.
But when the birthday boy walked in and saw everything, along with the reactions from the other kids, I knew it was completely worth it!
Clean Up & Tear Down
Cleanup after a party always happens faster than expected, especially when lots of people jump in to help.
Since the venue was a rental, I made sure all decor was easy to remove and non-damaging.
Not everything needed to be thrown away either. I separated items into:
- Save
- Garbage
Things Worth Saving
- Plastic tablecloths (if still clean)
- Themed decor that could be reused
- Cupcake toppers
You can also sell themed decor on Facebook Marketplace or give it away to another parent planning a similar party. It’s a great way to keep things out of landfills.
What to Bring When Decorating a Rental Space
A few things always come with me when setting up a party in a rented venue:
- Painter’s tape (for damage-free decorating)
- Scissors
- Extra garbage bags
- Paper towel
Little things like this save a lot of scrambling during setup.
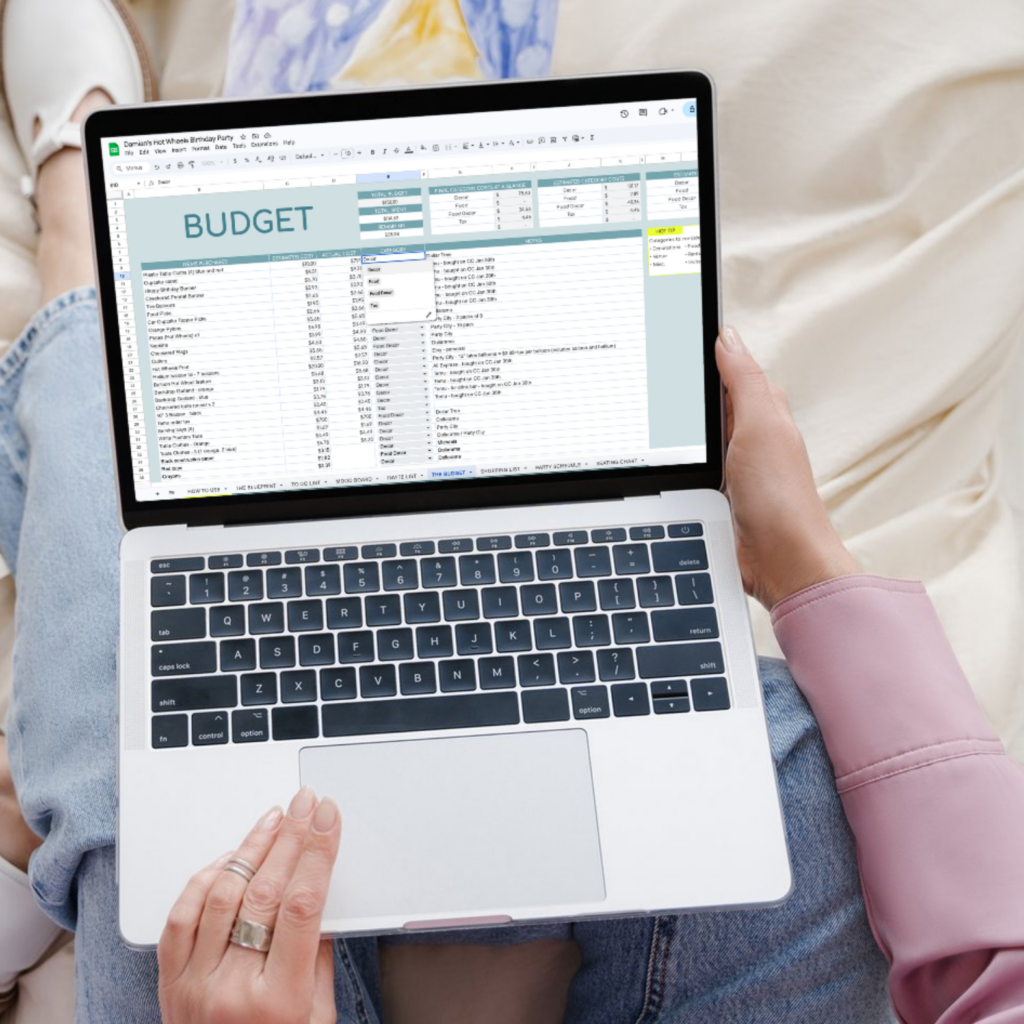
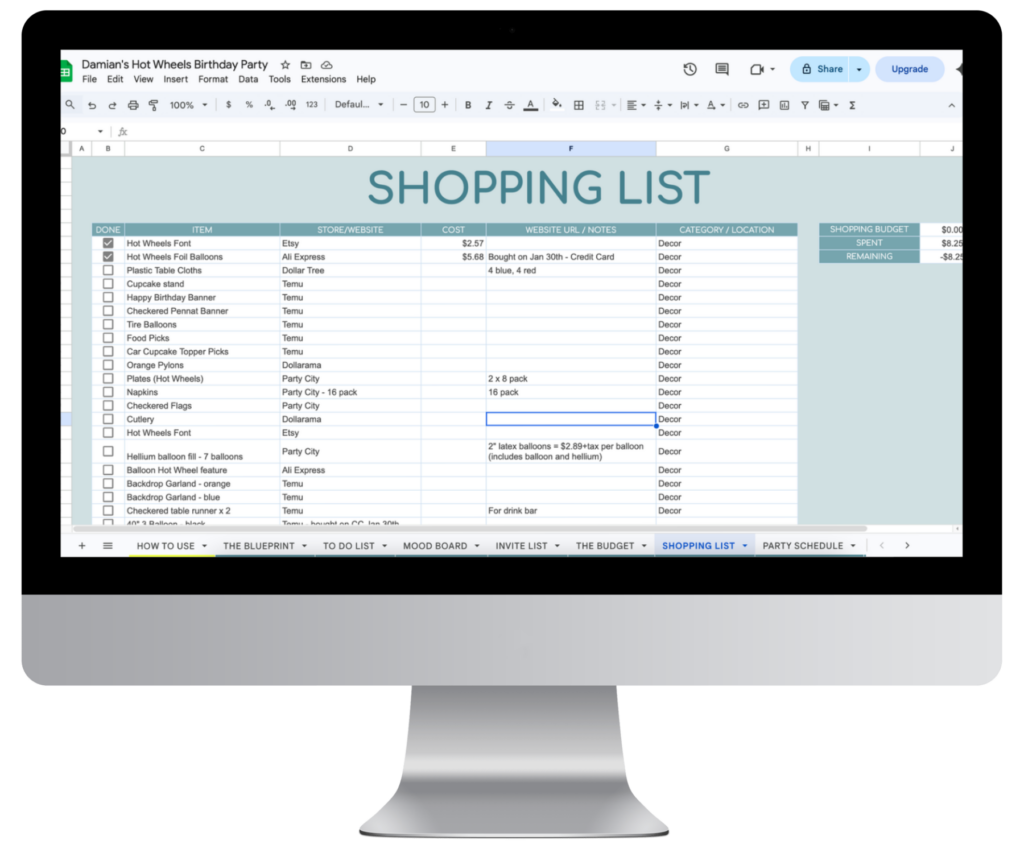
The Planning Tool That Made It All Work
The biggest thing that helped me stay organized — and on budget — was my planning spreadsheet.
Even though I wasn’t managing the guest list, it helped me track:
- decor purchases
- DIY tasks
- overall spending
It’s incredibly easy for a party budget to spiral when you’re not seeing the numbers in one place. Having everything mapped out made it easy to adjust plans before buying anything.
If you’re planning a party and want to stay organized with food, decor, rentals, and budgeting, a planning spreadsheet is a huge help.
You can grab a copy of mine here and reuse it anytime you’re hosting.
https://shorturl.fm/vmFYY
https://shorturl.fm/PfRHi